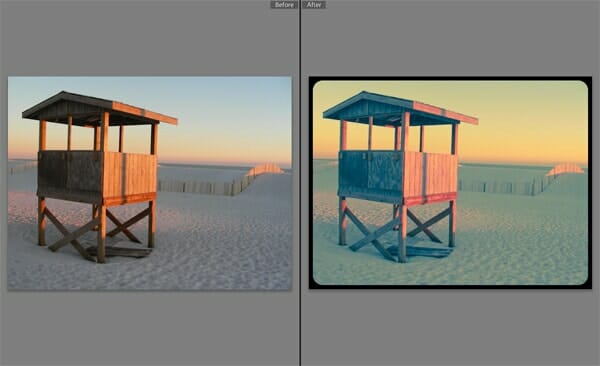
Want to learn a photo effect that makes almost any photo look better? This Lightroom tutorial will show you how! It?s a photo effect similar to the Instagram Nashville effect that hipsters seem to love. Read on to find out how you can turn any bad photo into artistic snapshots! PS: There?s a special trick in here that?ll show you how to create retro round borders.
Step 1
Here?s the photo that we?ll be using in this tutorial.

Step 2
Go to the Develop module in Lightroom. We?re going to start by reducing the contrast of the image. Set the Contrast to ?50 then increase the Fill Light by 50.

Here?s how it looks with the contrast reduced.

Step 3
Go into the Split Toning panel. Apply the settings shown below. You can just enter in the value shown below.

Here?s what the split toning effect looks like! You got a cool color for the shadows and a warm color for the highlights. This is one of my favorite color combinations for split toning effects!

You can use the Balance setting if you want to adjust the balance between the orange and blue colors.

Step 4
We?re going to finish it by adding a black border for the extra vintage feel. Wait, did we say ?borders? in Lightroom? Where in Lightroom can you add borders? Well, we?re actually going to add a vignette. But you?re going to learn how to manipulate the vignette setting to create a cool rounded border. Here?s how:
In the Post-Crop Vignetting settings, set the Amount to ?100.

You?ll get a nice black vignette like this.

Step 5
Set the Roundness to ?100.

Your vignette will turn into a cool round border like this! We?re not quite done, because next, we?ll need to make the border thicker.

Step 6
Set the Midpoint to 0.

This will move the vignette closer to the middle so you get a thicker border.

Step 7
Reduce the Feather to something near 0. This will make the border sharper but still leave a tiny bit of feather for slight edge glow.

Here?s the border! All created in Lightroom using the Post Crop Vignetting settings!

Step 8
Don?t forget to make a preset from this! In the Presets panel, click on the + icon to add a new Preset.

Checkmark these four settings. To minimize conflicts with other edited photos, you only want to checkmark the settings actually used in this photo effect. In this case, it is the fill light, contrast, split toning, and post-crop vignetting. Enter a name for it ? I called mine ?Instagram Nashville?.

Click create and now the preset will show up under ?User Presets? in the Presets panel. Just select any photo you want then click on this preset to apply
Final Results


Download the Lightroom Preset
If you don?t want to go through this tutorial, you can just download this Lightroom preset instead.


Again, looks harsh and rough. Especially colours. Do you know, how to get the same precision in colour when emulating instagram as these filters have: http://reallyniceimages.com/?p=21
Why is this NASHVILLE? Makes no sense
This is very nice and the way you edit takes the guesswork out of the editing
I??m very joyful to read this. This is the form of guide that has to be presented rather than the accidental misinformation that is at the other sites. Value your sharing this greatest doc.
nice thanks
thumbnail is missing
cool