Love it or hate it, this Lightroom tutorial will show you how to create these popular ?artistic? HDR photos. This effect gives a grunge effect where you can see more details. Note that while many people call this effect HDR, it does not actually make your photo an HDR image.
Step 1
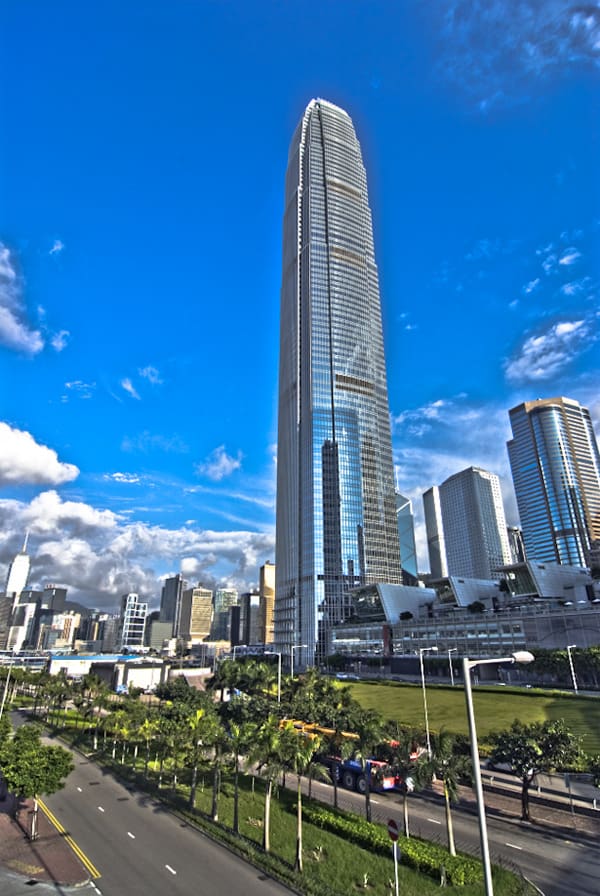
Start by opening an image in Lightroom. Note that this effect only works on images with a good dynamic range. So your outdoor sunny photos will work better than the dim indoor photos taken with a high ISO. Here?s the image that we?ll be working on.

Step 2
Start by reducing the exposure so that you can see the most details in the bright areas of your image. You may not always be able to reduce the exposure to ?4 depending on the available dynamic range of your image.
In case you?re wondering why we?re not using the recovery to do this, it?s because the recovery setting can be quite dangerous. Usually anything past 50 for recovery can start to cause problems where it is able to recover the grayscale data, but not the color data. It leaves you with areas that are just black & white. Of course, this depends on the type of camera you have but even with high-end DSLR, you need to be careful with the recovery settings.

Here?s what my image looks like with the exposure reduced. It looks pretty dark, but that?s okay because the primary purpose of this is to get the most details from the highlights. With almost all cameras out there, it is more difficult to recover highlights than shadows and that is why we?re working on the highlights first.

Step 3
Next, we?re going increase the fill light. This will increase the brightness of the midtones and naturally brighten your image.

As you can see, the fill light made the image look brighter without adjusting the exposure or brightness settings. You also have an artistic HDR photo now. In the next steps, we?re going to show you some other settings you can change. These are totally optional and it depends whether you like them and if they?ll work for your photo.
 m
m
Step 4
If you want to reveal more details in the highlights, you can increase the recovery setting. Note that the recovery setting can make parts of your image appear in grayscale depending on the available dynamic range of your image. When making adjustments over 50, zoom in and look at the highlights to ensure that you aren?t getting this effect.

The image on the left has a recovery setting of 30 while the image on the right has a recovery setting of 100. The recovery option generally affects the clouds revealing a lot of data. It?s up to you whether you like this or not. I?m just going to keep mine at 30 for now.

Step 5
Next, we?re going to skip to the Tone Curve. This tool lets you adjust your image even further. The settings you apply here will vary depending on your photo, but start off with the Lights and Darks settings. I set my Lights to +100 and Darks to ?66. Afterwards, I increased the Highlights and Shadows to +100.

Step 6
Next, we?re going to adjust the clarity. Have you ever seen those glowing halos in HDR photos and want to mimic it? The clarity setting is the one for this. Simply adjust the Clarity settings to your likings; the higher you go the more detail and halo you?ll see. Below is what my image looks like at +100.

If you reduce the Clarity you can also get a soft effect. Or you can leave the settings at 0 if you don?t want any of these settings.

Step 7
Finally, to finish the image, we?re going to adjust the brightness/contrast and vibrance/saturation settings. Edit the vibrance/saturation settings last because the images saturation changes as you make adjustments to the brightness/contrast. I reduced my contrast to reduce the HDR effect then brightened it a bit.

Finally, adjust the vibrance/saturation settings.

Final Results
Here?s the ?artistic? HDR effect all done in Adobe Lightroom! This photo effect is subjective but nonetheless it?s very popular.


Does anyone know how to do this in Photoshop?
use adobe camera raw from the filter menu in Photoshop
Although I didn't use this the way you did it... (too heavy look), I like the tutorial. I just use lesser settings for each
Such a nice effect. 🙂
where can download lightroom link?
I can't get mine to look like that...
can u make into preset and download?
Can it work with Lightroom 2? Not LR3
cool fx man
not caring fake or not,, just cool
I really don't like this effect... it's too fake and I see it all over Flickr. But I guess if you really want to know how to make this its a good guide
Why so bitter? If it floats your boat this is good... if not then don't do it
im with anne on this
too fake not my cup of tea
WOW!!!