Are you looking for a way to use LUTs in Lightroom? If so, then you may want to try creating Lightroom profiles. It is the only way to use LUTs in Lightroom. In this tutorial, you'll learn how to convert your LUTs into profiles that you can use in Lightroom.
Quick Answers
Can You Import LUTs into Lightroom?
You cannot import LUTs (Color Lookup Tables) into Lightroom. To use LUTs in Lightroom, you first need to convert the LUTs into Lightroom profiles.
How Do You Convert LUTs into Lightroom Profiles?
To convert LUTs into Lightroom profiles, you'll need to use Adobe Camera Raw. Follow the steps below to learn how.
Step 1 - Open a Photo in Adobe Photoshop
Start by opening any photo in Adobe Photoshop. The photo you open does not matter, but you should pick a photo that you want to preview the LUT on.

Step 2 - Open Adobe Camera Raw
Go to Filter > Camera Raw Filter. We are using Camera Raw to convert your LUT into a Lightroom profile.

Step 3 - Go to the Presets Panel
Press Shift+P or click on the Preset icon to go to the Presets panel.

Step 4 - Create a New Lightroom Profile (Not Lightroom Preset)
The tool to create Lightroom profiles is hidden. To access it, hold the Alt key (Option key on Macs) and click on the Create Preset button.
Important: You should see the "Create Profile" tool. If you see the "Create Preset" tool, make sure you are holding the Alt/Option key while pressing the Create Preset button.

Step 5 - Load Your LUT
Checkmark the "Color Lookup Table" option. A window will appear. Load your LUT (it should be a cube file).
If you need a LUT for practice, you can download the free Kodachrome LUT we're using in this tutorial.
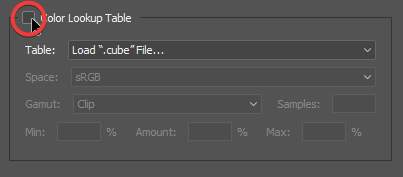
There are several settings you can add for these LUT. You can use the settings shown in the image below as a starting point.

LUT settings:
- Table: This is your LUT file
- Space: Use sRGB unless your LUT is specifically made for other color spaces.
- Gamut: If you select "clip", it will prevent your LUT from creating colors that are not available in your images color space. Choose clip if you are unsure.
- Samples: Samples is the number of grid points in your LUT. The higher the number, the more accurate your LUT will be at the cost of processing time. We recommend setting this to 7 for faster rendering or 32 for more accuracy.
- Min: This setting sets the lowest amount that your profile can be decreased to. We recommend leaving this at 0%.
- Amount: This is the default "amount" setting. We recommend leaving this at 100%.
- Max: This setting sets the highest amount that your profile can be increased to. We recommend leaving this at 200%.
Step 6 - Finding Your Lightroom Profile
You're done creating your Lightroom presets. You can find it by going to the Edit panel and clicking on the Browse Profile button.

Here you will find the profile browser and your profile should be under the "User Profiles" group.

Step 7 - Adding Contact and Copyright Information (Optional)
Lightroom profiles can hold additional details such as contact and copyright. This is useful if you will be sharing the profile. Otherwise, you can skip this.
Right-click on the profile you created and select "Rename Profile".

Here, you can change the settings for your Lightroom profile.

- Name: The name of the Lightroom profile
- Group: Choose a folder to store the profile
- Description (Optional): Enter a description for the profile
- Copyright (Optional): Enter the copyright details.
- Contact (Optional): Enter the contact details, such as where you found the preset or an email address.
Note: If you are not using your own LUT, you should not enter your own personal info. Either leave it blank or give proper credits.
To view the profile information, right-click on the profile and select "Profile Info".


Step 8 - Import the Lightroom Profile
Now that you've created your Lightroom profile, let's import it to Lightroom. Open Lightroom and import your Lightroom profile.
- Lightroom CC: Go to File > Import Profiles and Presets.
- Lightroom Classic CC: Go to the Develop module. In the Presets panel, click on the + icon and select "Import Presets".

You can find your Lightroom profile in the following folders:
- Windows: C:\Users\your_username\AppData\Roaming\Adobe\CameraRaw\Settings
- Macs: ~/Library/Application Support/Adobe/CameraRaw/Settings
Step 9 - Apply the Lightroom Profile
In the Edit panel, click on the Browse Profile button to open the Profile Browser. Click on the Lightroom profile that you imported.

Step 10 - Adjust the Amount
Exit out of the Profile Browser. Adjust the "Amount" slider to lessen or increase the profile's visibility.

You're done! You converted your LUT to a Lightroom profile. I have to admit, this is a lot of steps to use LUTs in Lightroom, but at least you now know how to do it.

I need to batch process LUTs to profiles 50 at a time. And I need it to make presets with the profiles. What's the solution to this?